In order to make our NES game at least somewhat interesting, we should add graphics. In order to accomplish this, we will first create some artwork then add it to our game as a background.
If you would like to follow along in my git repository, download or clone the following repository:
https://github.com/jonmoody/nes-tutorial
Then to see the code for this tutorial specifically, checkout the branch tutorial-2:
git checkout -b tutorial-2 remotes/origin/tutorial-2
Creating Graphics
Let’s get started by opening our graphics program YY-CHR. Since YY-CHR is a Windows program, if you’re developing on a Mac then you will need
to use Wine to open it. Once you get YY-CHR running, create a new file. Let’s save this new, blank file as a .chr (character memory) file.
If you’re as unoriginal as I am, feel free to name it graphics.chr.
There are two main views. On the left we can see the entire sprite sheet. The window on the right will display a subset of the left window for a magnified view. We will draw our graphics on the right side. Think of it like a basic paint program. You can draw stuff on it. However, there are a few things to keep in mind for now:
- Graphics on the NES are made up of 8x8 pixel tiles
- Each tile can only display a maximum of four colors
- The NES only has about 54 different colors to choose from
After drawing some graphics in our sprite sheet, it should look something like this:
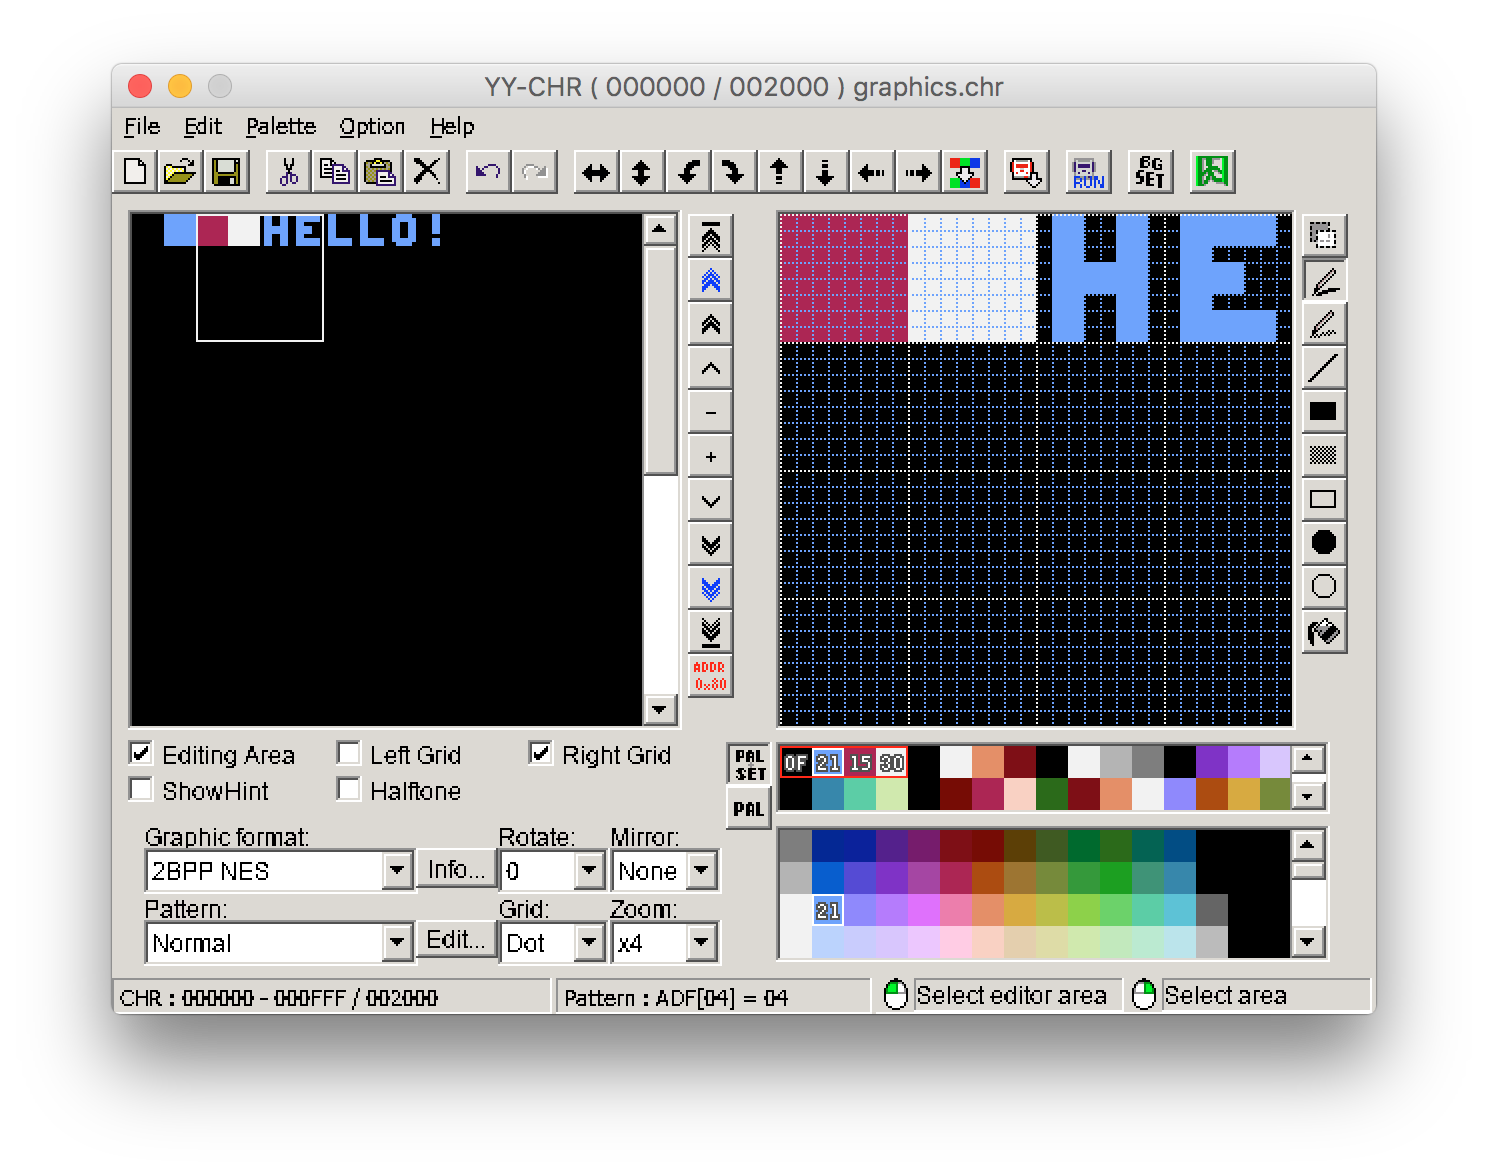
In the bottom right corner we can see all the colors available to us for the NES. Just above that there are two rows of colors which represent the color palettes. We will delve deeper into the palettes in a future tutorial, but know that the color palette we set here in this program has no bearing on what is represented in the game. We can change the palette in YY-CHR to get a better idea of how our graphics might look, but these colors will need to be set programmatically in code. Basically we are just telling each pixel in the tile if it is color 1, 2, 3 or 4.
Loading Graphics Data Into Our Game
Now that we have our graphics.chr file populated with graphics, it’s time to include it in our game. In the previous tutorial we created
an empty bank to hold our graphics data, so now it’s time to put it to work by including it as a binary file:
  .bank 2
  .org $0000
  .incbin "graphics.chr"
Creating a Background
Now we want to create a background, so we’re going to create something called a nametable. This is a data representation of what an entire background will look like. Each byte of data will represent one graphical tile on the screen (an 8x8 pixel square). The resolution for the NES is 256x240 pixels, so a background will be made up of 32 tiles across, and 30 tiles down. If you do the math, that means we need 960 bytes to accomplish this. Additionally, each byte easily corresponds with the tiles in our sprite sheet (with $00 being the first tile, $01 being the second and so on). Note that these values are in hex, so after $09 comes $0A.
Once created, our nametable looks something like this:
  .db $00,$00,$00,$00,$00,$00,$00,$00,$00,$00,$00,$00,$00,$00,$00,$00
  .db $00,$00,$00,$00,$00,$00,$00,$00,$00,$00,$00,$00,$00,$00,$00,$00

  .db $00,$00,$00,$00,$00,$00,$00,$00,$00,$00,$00,$00,$00,$00,$00,$00
  .db $00,$00,$00,$00,$00,$00,$00,$00,$00,$00,$00,$00,$00,$00,$00,$00

  .db $00,$00,$00,$00,$00,$00,$00,$00,$00,$00,$00,$00,$00,$00,$00,$00
  .db $00,$00,$00,$00,$00,$00,$00,$00,$00,$00,$00,$00,$00,$00,$00,$00

  .db $00,$00,$00,$00,$00,$00,$00,$00,$00,$00,$00,$00,$00,$00,$00,$00
  .db $00,$00,$00,$00,$00,$00,$00,$00,$00,$00,$00,$00,$00,$00,$00,$00

  .db $00,$00,$00,$00,$00,$00,$00,$00,$00,$00,$00,$00,$00,$04,$05,$06
  .db $07,$08,$09,$00,$00,$00,$00,$00,$00,$00,$00,$00,$00,$00,$00,$00

  .db $00,$00,$00,$00,$00,$00,$00,$00,$00,$00,$00,$00,$00,$00,$00,$00
  .db $00,$00,$00,$00,$00,$00,$00,$00,$00,$00,$00,$00,$00,$00,$00,$00

  .db $00,$00,$00,$00,$00,$00,$00,$00,$00,$00,$00,$00,$00,$00,$00,$00
  .db $00,$00,$00,$00,$00,$00,$00,$00,$00,$00,$00,$00,$00,$00,$00,$00

  .db $01,$01,$01,$01,$01,$01,$01,$01,$01,$01,$01,$01,$01,$01,$01,$01
  .db $01,$01,$01,$01,$01,$01,$01,$01,$01,$01,$01,$01,$01,$01,$01,$01

  .db $01,$01,$01,$01,$01,$01,$01,$01,$01,$01,$01,$01,$01,$01,$01,$01
  .db $01,$01,$01,$01,$01,$01,$01,$01,$01,$01,$01,$01,$01,$01,$01,$01

  .db $01,$01,$01,$01,$01,$01,$01,$01,$01,$01,$01,$01,$01,$01,$01,$01
  .db $01,$01,$01,$01,$01,$01,$01,$01,$01,$01,$01,$01,$01,$01,$01,$01

  .db $01,$01,$01,$01,$01,$01,$01,$01,$01,$01,$01,$01,$01,$01,$01,$01
  .db $01,$01,$01,$01,$01,$01,$01,$01,$01,$01,$01,$01,$01,$01,$01,$01

  .db $01,$01,$01,$01,$01,$01,$01,$01,$01,$01,$01,$01,$01,$01,$01,$01
  .db $01,$01,$01,$01,$01,$01,$01,$01,$01,$01,$01,$01,$01,$01,$01,$01

  .db $01,$01,$01,$01,$01,$01,$01,$01,$01,$01,$01,$01,$01,$01,$01,$01
  .db $01,$01,$01,$01,$01,$01,$01,$01,$01,$01,$01,$01,$01,$01,$01,$01

  .db $01,$01,$01,$01,$01,$01,$01,$01,$01,$01,$01,$01,$01,$01,$01,$01
  .db $01,$01,$01,$01,$01,$01,$01,$01,$01,$01,$01,$01,$01,$01,$01,$01

  .db $02,$02,$02,$02,$02,$02,$02,$02,$02,$02,$02,$02,$02,$02,$02,$02
  .db $02,$02,$02,$02,$02,$02,$02,$02,$02,$02,$02,$02,$02,$02,$02,$02

  .db $02,$02,$02,$02,$02,$02,$02,$02,$02,$02,$02,$02,$02,$02,$02,$02
  .db $02,$02,$02,$02,$02,$02,$02,$02,$02,$02,$02,$02,$02,$02,$02,$02

  .db $02,$02,$02,$02,$02,$02,$02,$02,$02,$02,$02,$02,$02,$02,$02,$02
  .db $02,$02,$02,$02,$02,$02,$02,$02,$02,$02,$02,$02,$02,$02,$02,$02

  .db $02,$02,$02,$02,$02,$02,$02,$02,$02,$02,$02,$02,$02,$02,$02,$02
  .db $02,$02,$02,$02,$02,$02,$02,$02,$02,$02,$02,$02,$02,$02,$02,$02

  .db $02,$02,$02,$02,$02,$02,$02,$02,$02,$02,$02,$02,$02,$02,$02,$02
  .db $02,$02,$02,$02,$02,$02,$02,$02,$02,$02,$02,$02,$02,$02,$02,$02

  .db $02,$02,$02,$02,$02,$02,$02,$02,$02,$02,$02,$02,$02,$02,$02,$02
  .db $02,$02,$02,$02,$02,$02,$02,$02,$02,$02,$02,$02,$02,$02,$02,$02

  .db $02,$02,$02,$02,$02,$02,$02,$02,$02,$02,$02,$02,$02,$02,$02,$02
  .db $02,$02,$02,$02,$02,$02,$02,$02,$02,$02,$02,$02,$02,$02,$02,$02

  .db $03,$03,$03,$03,$03,$03,$03,$03,$03,$03,$03,$03,$03,$03,$03,$03
  .db $03,$03,$03,$03,$03,$03,$03,$03,$03,$03,$03,$03,$03,$03,$03,$03

  .db $03,$03,$03,$03,$03,$03,$03,$03,$03,$03,$03,$03,$03,$03,$03,$03
  .db $03,$03,$03,$03,$03,$03,$03,$03,$03,$03,$03,$03,$03,$03,$03,$03

  .db $03,$03,$03,$03,$03,$03,$03,$03,$03,$03,$03,$03,$03,$03,$03,$03
  .db $03,$03,$03,$03,$03,$03,$03,$03,$03,$03,$03,$03,$03,$03,$03,$03

  .db $03,$03,$03,$03,$03,$03,$03,$03,$03,$03,$03,$03,$03,$03,$03,$03
  .db $03,$03,$03,$03,$03,$03,$03,$03,$03,$03,$03,$03,$03,$03,$03,$03

  .db $03,$03,$03,$03,$03,$03,$03,$03,$03,$03,$03,$03,$03,$03,$03,$03
  .db $03,$03,$03,$03,$03,$03,$03,$03,$03,$03,$03,$03,$03,$03,$03,$03

  .db $03,$03,$03,$03,$03,$03,$03,$03,$03,$03,$03,$03,$03,$03,$03,$03
  .db $03,$03,$03,$03,$03,$03,$03,$03,$03,$03,$03,$03,$03,$03,$03,$03

  .db $03,$03,$03,$03,$03,$03,$03,$03,$03,$03,$03,$03,$03,$03,$03,$03
  .db $03,$03,$03,$03,$03,$03,$03,$03,$03,$03,$03,$03,$03,$03,$03,$03

  .db $03,$03,$03,$03,$03,$03,$03,$03,$03,$03,$03,$03,$03,$03,$03,$03
  .db $03,$03,$03,$03,$03,$03,$03,$03,$03,$03,$03,$03,$03,$03,$03,$03

  .db $03,$03,$03,$03,$03,$03,$03,$03,$03,$03,$03,$03,$03,$03,$03,$03
  .db $03,$03,$03,$03,$03,$03,$03,$03,$03,$03,$03,$03,$03,$03,$03,$03

  .db $03,$03,$03,$03,$03,$03,$03,$03,$03,$03,$03,$03,$03,$03,$03,$03
  .db $03,$03,$03,$03,$03,$03,$03,$03,$03,$03,$03,$03,$03,$03,$03,$03

  .db $03,$03,$03,$03,$03,$03,$03,$03,$03,$03,$03,$03,$03,$03,$03,$03
  .db $03,$03,$03,$03,$03,$03,$03,$03,$03,$03,$03,$03,$03,$03,$03,$03
Wow, what a dumpster fire that is. Anyway, I personally like to take these and put them in their own folder and file such as
graphics/background.asm so they don’t muddy up the rest of my codebase. We will then include this file where we need it, by modifying
our existing bank to hold this data:
  .bank 1
  .org $E000

background:
  .include "graphics/background.asm"

  .org $FFFA
  .dw NMI
  .dw RESET
  .dw 0
The .include directive will simply take the contents of that file and drop it where the include happens. This is a great way to keep
large files such as our background nametables out of the way. We will also give this data the label background: so that we can refer
to it later.
Displaying a Background
We’re getting close. Now it’s time to loop through all that data we created and send it off to the PPU (Picture Processing Unit) to be displayed onto the screen.
Near the beginning of our code file, right after our four .ines directives, we need to add a couple variables:
  .rsset $0000
pointerBackgroundLowByte  .rs 1
pointerBackgroundHighByte .rs 1
The .rsset directive is defining where in memory our variables will be located. In this case, it will start them at the memory location
$0000. From there we create two variables named pointerBackgroundLowByte and pointerBackgroundHighByte which we will use to loop through
all the data. The .rs directive is used to define how many bytes are allocated to that variable. In this case, each of our variables will
require one byte.
Now it’s time to loop through all 960 bytes of background data. We will create a method to do this:
RESET:
  JSR LoadBackground
The JSR (Jump to SubRoutine) operation will jump to that label, then return here once it is done. Now that we call this method, it’s time to add it, otherwise it won’t assemble. We will place this method at the end of our RESET method, after the InfiniteLoop:
LoadBackground:
  LDA $2002
  LDA #$20
  STA $2006
  LDA #$00
  STA $2006

  LDA #LOW(background)
  STA pointerBackgroundLowByte
  LDA #HIGH(background)
  STA pointerBackgroundHighByte

  LDX #$00
  LDY #$00
.Loop:
  LDA [pointerBackgroundLowByte], y
  STA $2007

  INY
  CPY #$00
  BNE .Loop

  INC pointerBackgroundHighByte
  INX
  CPX #$04
  BNE .Loop
  RTS
This is a hefty method, with several new operations we haven’t seen yet, so let’s walk through it.
Now is the time to understand what our registers are and what they’re used for, because we’re starting to interact with them. There are four registers on the NES. The Accumulator is probably the most important register and can do many things, including loading values into it, storing values from it, and is the only register that is capable of doing math. There are two more registers, one of which is called the X register and the other being the Y register. These two registers can load and store values, but cannot perform math operations, which makes them great for loops. The fourth register is called the Status register. This register can hold information about the last instruction, including if the result was zero or negative.
That being said, let’s take a look at the first chunk of that method:
  LDA $2002
  LDA #$20
  STA $2006
  LDA #$00
  STA $2006
The LDA (Load Accumulator) operation will take a raw value or value from a memory address and load it into the accumulator register. In this particular case, we are loading the address $2002 specifically to reset the PPU. From there we then load #$20 into the accumulator. The # sign means it is a value, and the $ sign means it is in hexadecimal. We then take this value and use the STA (Store Accumulator) operation to take that value and store it at the memory location $2006. We do this again with the value #$00 and send it to $2006. The memory address $2006 is a port to the PPU to tell it where to store the background data. Because the memory addresses are two bytes and we can only send one byte at a time, we have to perform this action twice. Put the two values we sent together and we get the memory location $2000 on the PPU.
Let’s take a look at the next bit of code:
  LDA #LOW(background)
  STA pointerBackgroundLowByte
  LDA #HIGH(background)
  STA pointerBackgroundHighByte
This is where we use those variables we created earlier. We want to load the low byte of our background data and store it in our
pointerBackgroundLowByte variable, and then take the high byte of our background data and store it in pointerBackgroundHighByte. This
is used to loop through all the data. #LOW and #HIGH are predefined functions for the nesasm assembler.
Now let’s take a look at the actual loop itself:
  LDX #$00
  LDY #$00
.Loop:
  LDA [pointerBackgroundLowByte], y
  STA $2007

  INY
  CPY #$00
  BNE .Loop

  INC pointerBackgroundHighByte
  INX
  CPX #$04
  BNE .Loop
The LDX and LDY operations perform much like the LDA operation does, except it loads data into the X or Y registers instead of the Accumulator. We will initialize both the X and Y registers with the value #$00, then begin our loop. You will notice something different about this label, in that it starts with a period. This is used to denote a local method and will not be accessible from outside of its parent label.
After this, we load the low byte of our background data and store it in address $2007. Writing a byte to $2007 communicates one graphical tile to the PPU, so we will need to repeatedly send data to this address until we’re done. After we write that byte, we use the INY (Increment Y) operation to increment the value in the Y register. We then check the contents of the Y register and compare it to the value #$00 by using the CPY operation. Then we use the BNE (Branch if Not Equal) operation to loop if the value is not zero. The initial LDA operation we do has an added benefit: it uses the Y register to offset the memory access. Each time it will load the next byte in the sequence.
Notice the rest of the method contains a secondary loop. We do this because we have too much data to send with a single register (960 bytes). Since we can only store one byte in a register at a time, we can only go up to 256 until we start to overflow. Once we overflow and hit #$00 again, we are using the X register to only allow this to happen 4 times before bailing out, which is enough to get the 960 bytes of data we need.
At the very end of this method, we add this operation:
RTS
The RTS (Return from Subroutine) operation will mark the end of a method and return to where it was originally called.
Enabling Graphics
After all that, we’re still not done? When I said earlier that we were getting close, I lied. But now we’re actually close. It’s possible that you no longer trust me. Well, all we have to do is enable graphics and we’re home free, so let’s add this code to the end of our RESET method:
  LDA #%10000000   ; Enable NMI, sprites and background on table 0
  STA $2000
  LDA #%00011110   ; Enable sprites, enable backgrounds
  STA $2001
  LDA #$00         ; No background scrolling
  STA $2006
  STA $2006
  STA $2005
  STA $2005
Something new we notice is that we’re using binary instead of hex, and the % sign on the value tells us this. Binary is easier for these particular values because each bit represents a flag to enable or disable something on the PPU. We can do additional things with those bits, but we are enabling the NMI (our game loop interrupt), setting our background to table 0 (which will use that address $2000 we sent the PPU earlier), enabling sprites and backgrounds, then disabling background scrolling because we don’t care about that yet.
Sweet. Build this code with nesasm nes-tutorial.asm and load the .nes file into an emulator:
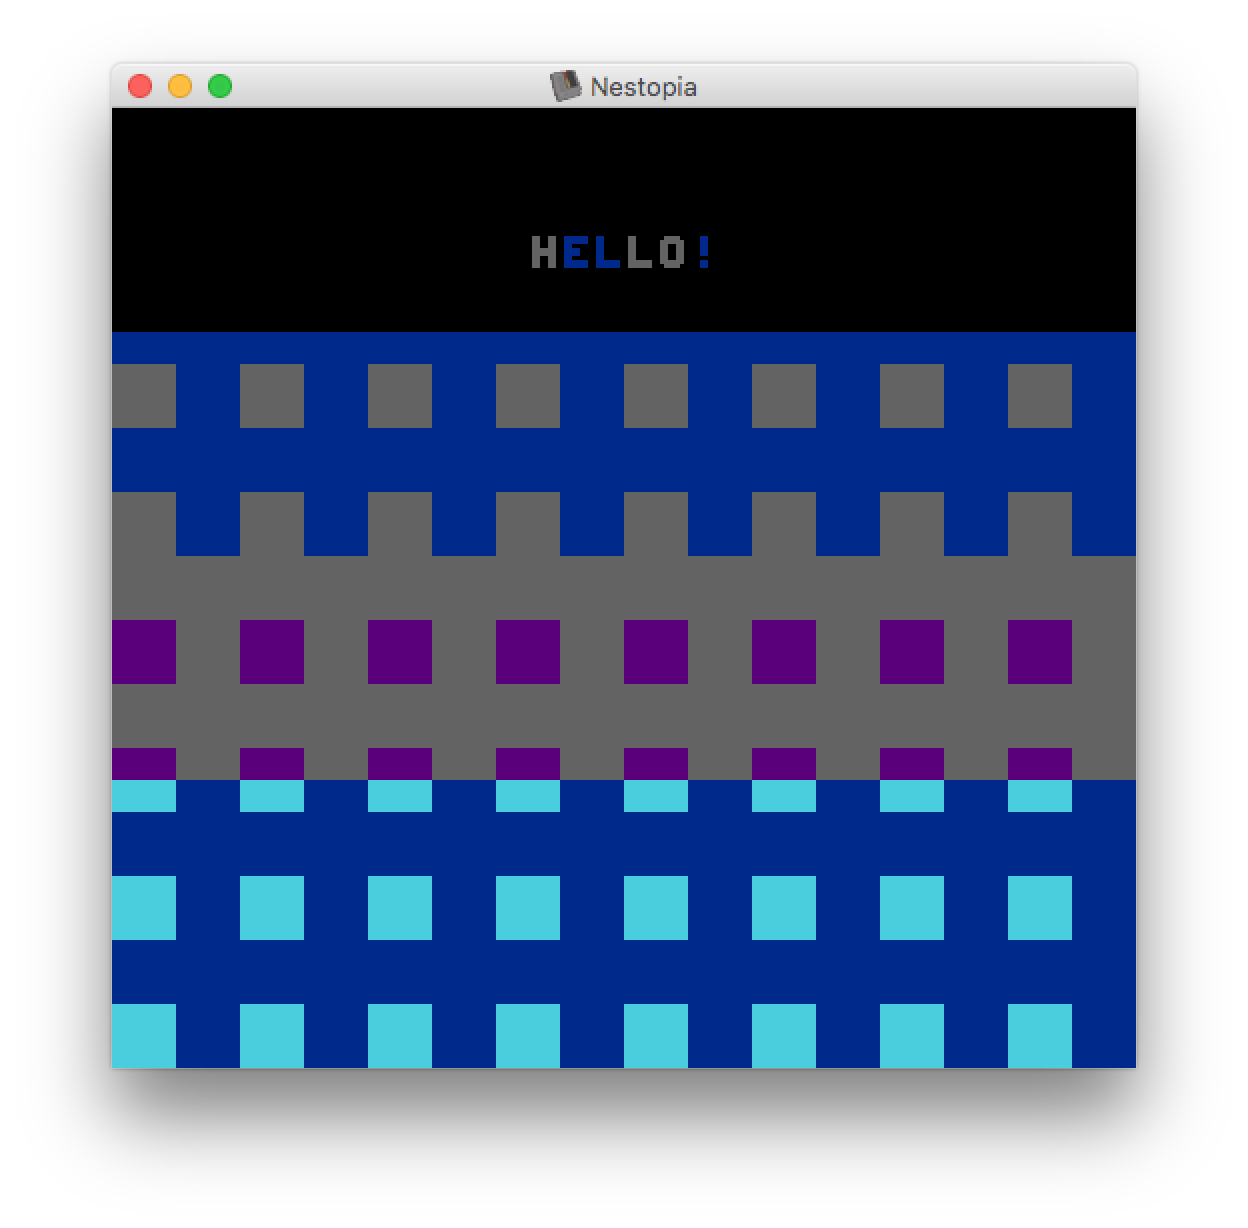
Well that’s pretty much an eyesore with out of control colors, but it’s an awesome achievement that we have graphics on the screen! It’s the first major step to something great. Plus, we got a lot of the hard stuff out of the way.
In the next tutorial we will discuss color palettes and turning this screen into something a little more respectable.