The NES is certainly limited with the number of colors available to use. We need to create something called a color palette to decide which colors to display on the screen.
Color Limitations
The NES only contains about 54 useful colors. The following image shows all the colors we can use:

Even though there are technically 64 spaces there, notice that 10 of those colors are black, two of the colors are white, and two sets of gray are very similar to one another that they might as well not even be counted as separate colors. So, we end up with around 54 colors.
When we create an NES game, we get our colors from what is called a color palette. We can choose a subset of these 54 possible colors to use at any particular time in our game. A single color palette contains 4 colors, and we can choose from 4 possible color palettes for the background, and 4 possible color palettes for the sprites.
In the previous tutorial we learned that we can have four colors per graphical tile. Because of this, each graphical tile in the background is assigned one of the four color palettes.
Just when you thought it couldn’t get any worse, with a maximum of 16 colors for the background, the first color in each of the four background color palettes must be a shared color. That brings our maximum number of background colors down to a whopping 13.
Creating a Color Palette
If you would like to follow along in my git repository, download or clone the following repository:
https://github.com/jonmoody/nes-tutorial
Then to see the code for this tutorial specifically, checkout the branch tutorial-3:
git checkout -b tutorial-3 remotes/origin/tutorial-3
Let’s create the data that represents our color palettes. Don’t worry, it’s nowhere near as shocking as the background data:
  .db $0F,$21,$15,$30, $0F,$0F,$0F,$0F, $0F,$0F,$0F,$0F, $0F,$0F,$0F,$0F
  .db $0F,$21,$15,$30, $0F,$0F,$0F,$0F, $0F,$0F,$0F,$0F, $0F,$0F,$0F,$0F
That’s all. Take this data and put it in the new file graphics/palettes.asm. The first row of bytes is for the background, and the second row of bytes are for the sprites (which we will deal with in a future tutorial). Each group of four bytes is a single color palette. In the above example, we set some colors to the first background and sprite palettes, then left everything else black. Oh wait, it wasn’t obvious that $0F was black? Take a look at the color palette image above. The top left dark gray color is $00, and we can continue to move all the way to the bottom right black color, which is $3F. However, the color on the top right ($0F) is also black.
If we take a look at the values provided in the example, we can see that the first color palette consists of black ($0F), light blue ($21), red ($15), and white ($30).
Loading the Color Palettes
Now that we have the data, let’s include it in our main code file:
palettes:
  .include "graphics/palettes.asm"
We can put this right after the place in bank 1 where we included our background data.
Now, it’s time to load the palette data with a loop much like we did for the background data. However, because we only have 32 bytes of data, our code will be much simpler. Let’s create a method to load the palettes:
LoadPalettes:
  LDA $2002
  LDA #$3F
  STA $2006
  LDA #$00
  STA $2006

  LDX #$00
.Loop:
  LDA palettes, x
  STA $2007
  INX
  CPX #$20
  BNE .Loop
  RTS
The first part of this method looks quite similar to the start of our LoadBackground method. However, we are telling the PPU that we will be loading the palette data into the PPU’s address $3F00. This is where the palette data is located on the PPU.
We then start our loop, and load each byte of the palette one at a time into the PPU. One thing to notice is that we initialize the X register to 0 when we start the loop, and after we increment it, we check to see if the value in the X register is #$20, which is 32 in decimal. Because we only have to loop 32 times, we don’t require an inner loop because we are not in danger of overflowing.
We now have to call this method from our RESET method after we load our background:
JSR LoadPalettes
Cool, the palettes have been successfully loaded, but now we need to assign color palettes to areas of the background. This is where the attributes come in.
Attributes
It’s really unfortunate, but due to hardware limitations, we cannot assign a color palette to each background tile individually. We have to assign the color palettes in groups of tiles. Let’s take a look at what the background attribute table looks like and go into further detail:
  .db %00000000, %00000000, %00000000, %00000000, %00000000, %00000000, %00000000, %00000000
  .db %00000000, %00000000, %00000000, %00000000, %00000000, %00000000, %00000000, %00000000
  .db %00000000, %00000000, %00000000, %00000000, %00000000, %00000000, %00000000, %00000000
  .db %00000000, %00000000, %00000000, %00000000, %00000000, %00000000, %00000000, %00000000
  .db %00000000, %00000000, %00000000, %00000000, %00000000, %00000000, %00000000, %00000000
  .db %00000000, %00000000, %00000000, %00000000, %00000000, %00000000, %00000000, %00000000
  .db %00000000, %00000000, %00000000, %00000000, %00000000, %00000000, %00000000, %00000000
  .db %00000000, %00000000, %00000000, %00000000, %00000000, %00000000, %00000000, %00000000
Create the new file graphics/attributes.asm and put this data in it.
Because these bytes use the % sign, they are in binary. It’s recommended that we do this for the attributes specifically because they’re easier to work with this way. Let’s break down one of these bytes.
Each byte of attribute data will control the color palettes for a 32x32 pixel square (4x4 tiles), with the first byte being up in the top right corner of the screen. Going deeper, each set of 2 bits in the byte will define the color palette for a 16x16 pixel (2x2 tile) quadrant of that area. All of the bytes above consisting of all zero means that the entire background will use the first color palette.
Because all zero is too easy, let’s pretend that one of those bytes looks like this: %00011011. Let’s break it out a little more into sets of 2 bits: 00 01 10 11. In this byte we are using all four possible color palettes. The sets of 2 bits will create the color palettes for the 2x2 tile quadrants starting in the bottom left corner and moving counter-clockwise. The first color palette (00) will be assigned to the bottom left corner, the second color palette (01) will be in the bottom right, the third (10) is in the top right corner, and finally the fourth color palette (11) is used in the top left corner.
Sometimes the greatest way to truly understand what these attributes are doing is to flip some of the bits, rebuild your game and see what the results are.
Anyway, we have our background data so let’s include it in our main code file just like we did for the background and palette data:
attributes:
  .include "graphics/attributes.asm"
Now let’s make another method that loops through all the attribute data and throws it over to the PPU:
LoadAttributes:
  LDA $2002
  LDA #$23
  STA $2006
  LDA #$C0
  STA $2006
  LDX #$00
.Loop:
  LDA attributes, x
  STA $2007
  INX
  CPX #$40
  BNE .Loop
  RTS
This works exactly like the palette loop earlier in this tutorial. This loop however, will loop 64 times (#$40) before finishing since we have 64 bytes worth of attribute data. One more thing to know is that the PPU stores its attribute data at memory address $23C0. This is actually pretty close to where we stored the background data ($2000). You remember how for the background we loaded 256 bytes, 4 times? We have 960 bytes of background data but we actually looped 1,024 times. Because we’re lazy like that, data overflowed into the place where the attributes are stored. That’s why the background in the previous tutorial had messed up squares all over the place, because it was inadvertently changing the background attributes. It’s important to understand that overflowing data into places it’s not supposed to go can have unintended results. It’s possible that I did this on purpose to provide a teachable moment like this, but you’ll never know for sure!
Now if we build everything with nesasm nes-tutorial.asm and load it into the emulator we get something a little more expected:
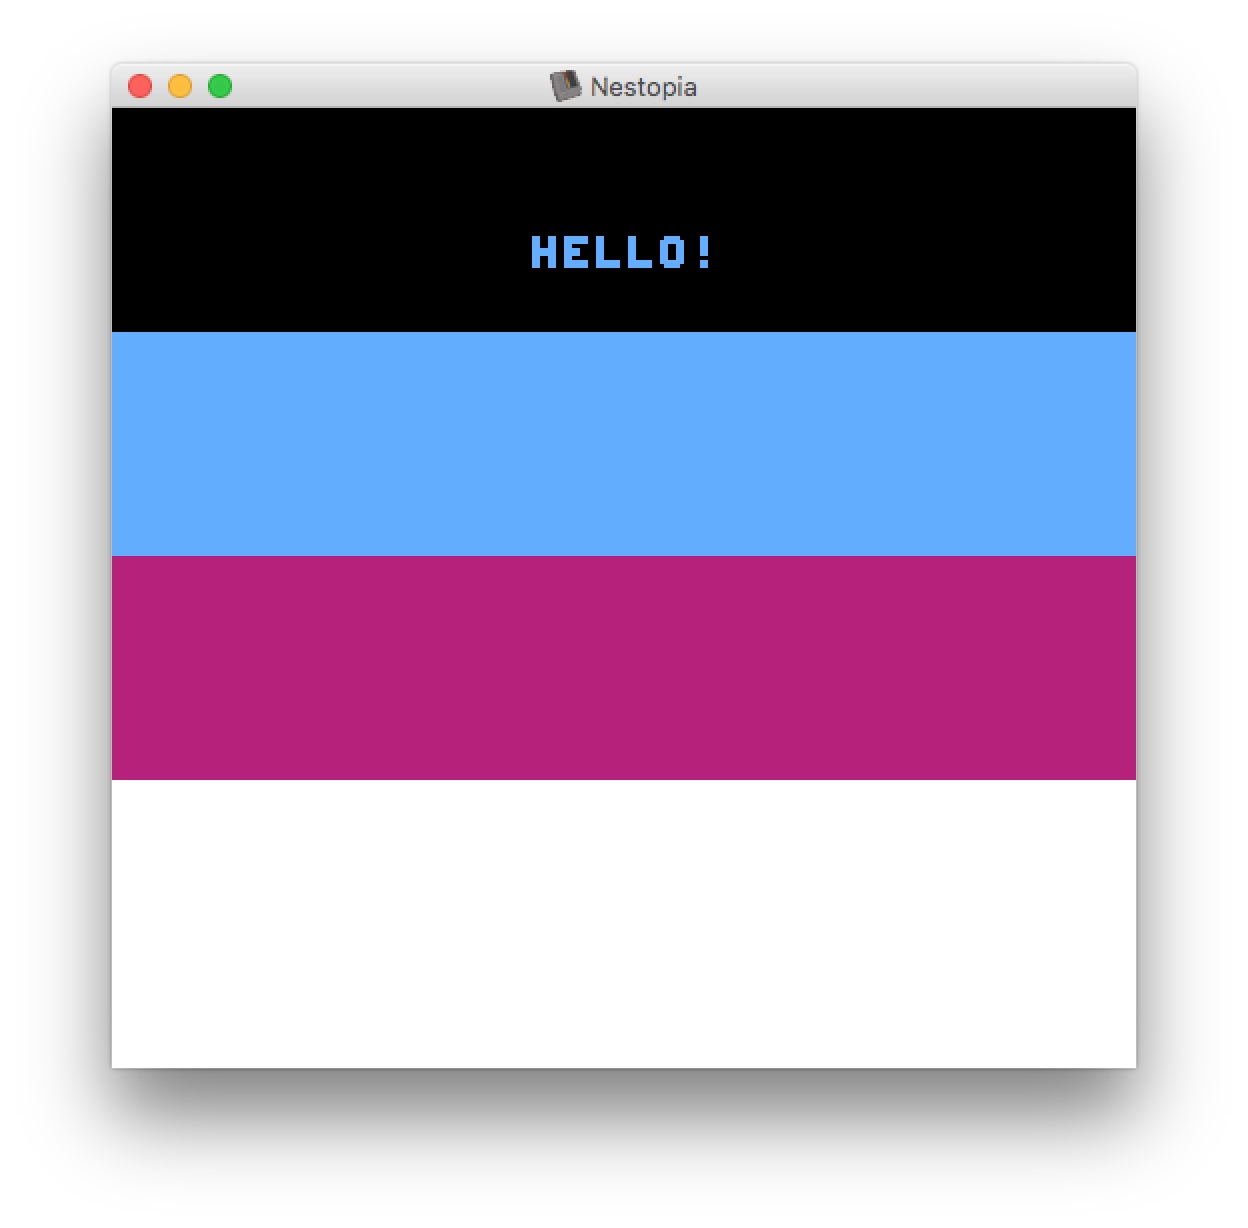
Pretty cool! The next tutorial will cover adding sprites to the game that we can eventually move around and control, because an NES game without sprites is basically just a painting.